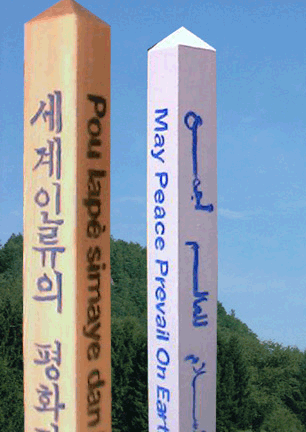
To see peace poles I make, click here.
This page shows how to:
Choose lumber, Carve cap, Preserve wood, Peace Pole Languages, Choose paint, Choose paint brush, Plant peace pole (opens new page), etc.
Carve the cap first to avoid marring the text on your garden peace pole.
Making a Cap on Wooden Peace Poles
People often buy a fence post cap and slap it on a wooden 4 by 4. Maybe it is because I’m a sculptor, but to me those caps look wrong. This 45 second video shows how to make a peace pole cap in 20 minutes with a kitchen knife. I used a piece of a 2 by 2 as a striker instead of a hammer. I set the knife where I wanted to remove wood and then hit it with the wooden striker (a hammer wouldn’t have been good for the knife), so the blade always was going away from me.
When making a peace pole or anything else out of wood, it is easier to carve on a ridge, so start on a corner. Then create more ridges. You can practice this on the bottom of your peace pole. If it turns out well, use it for the top.
Sawing a cap
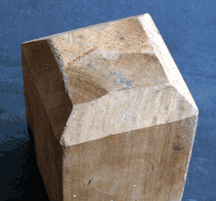
The cap doesn’t have to be a point. This is a partial pyramid. If you don’t carve the top, sawing a pyramid is not hard. This one, that I made with a handsaw to show you, has been a doorstop for 15 years, as you can see.
If it doesn’t come out right, you can cut another inch off and try again. It can be done with a circular saw or a handsaw.
Below is a shed roof cap I carved – 12 minutes. It could be sawed too. Carving is just cooler.

I carved with a vice holding my pole, but you could sit on your pole, or have someone else sit on your pole, to hold it steady while you carve. Like, set it across two chairs, or on a table, or hanging off porch steps – someplace where someone can sit on it, possibly with a pillow, while the end is in a comfortable place for you to carve. Carving and chipping does not fill the air with dust like sawing. It mainly is wood chips flying.
Getting text on the wood
This usually is the first thing about which people are concerned when it comes to making a peace pole. I suggest printing peace pole templates for free and working from those on the pole.
Making Templates
Below is how to printout templates of the peace pole languages on your computer: The translations to use are at this link: Peace Pole Languages.
A normal printer will not print out anything longer than a 14-inch-long legal page. Your translations should be about 28 inches long. Some art programs divide the translation into three sections, each shorter than 14 inches, print out the three sections and then tape the three pages together to make one long template.

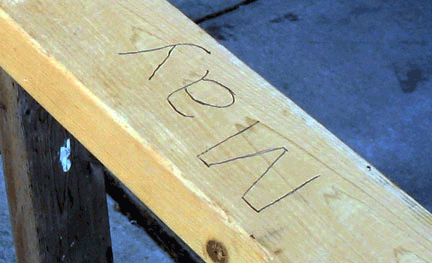
Set the templates on the pole. Drag a pencil or ballpoint pen on top of the letters heavily enough to leave an impression in the wood. The impression is the rough guide for your paintbrush. You can either draw the outline of the letters or just draw the center line of each one. In the photo above I drew the center line of each as a guide for my brush strokes.
For languages that do not use our alphabet, following the center line might not provide all the information you need. It can be more useful to outline the characters so that you see when the brush stroke should be wide or tapered or have the end squared off. But for most languages, it is easier to run the brush along the center line. Normally there would be only a light impression in the wood made by the pressure of the pen or pencil on the paper, with no actual pencil lead coloring the wood. But that did not show up well in these photos. So, I ran a pen through the impressions to make them visible in the photo.
Choosing the Brush
Paint the letters over the lines with a small paint brush. An artist’s supply or a craft shop has such brushes. You might want one kind of brush for languages that are like English that evolved on printing presses and another kind for languages like Chinese that evolved on the end of a brush.

The brush in the top of this photo is the one I find most useful. It is called a “quarter inch angular shader.” It is a flat brush. The square edge allows a precision useful in duplicating text. Springing for an expensive one of these can make a big difference in how your pole turns out. This isn’t the place to cut corners. Buy cheap wood and cheap paint if you want but pay $20 and get a good brush.
Planting Garden Peace Poles
In the world of peace poles, they don’t say “erecting” or “installing peace poles.” They say “plant.” To see another page with ways to plant peace poles, click: Peace Pole Planting
Choosing the Wood
One thing to consider when learning how to make a peace pole is the type of wood you plan on using. What kind of wood? Treated or untreated? Clear or construction grade?
In lumber, the word “clear” means “without knots.” How important this is varies depending on your project and whether you are free to sift through the pile of lumber at the lumber yard looking for the best piece. If you are applying plaques to the pole, knots are okay.
If you are carving the text into your garden peace pole, you must get wood that is clear, at least in the section to be carved. If the cap is the only part being carved, it’s not as much of a problem. Or if you are painting the text, a few knots might not be a problem depending on where they are and how big they are. Knots are the first thing to deteriorate as the pole weathers. Knots expand and contract differently than the surrounding wood and can fall out leaving a hole. If that knot is in the middle of the “a” carved in the word peace, it might not be the effect you want.

Cedar is a common choice for garden peace poles because it resists rot and bugs so well. But you have to be careful of clerks in home improvement stores who sometimes casually refer to their wood as cedar when it only is pine. Real cedar is more expensive. Especially if it is smooth cut and clear.
Most people in construction want cedar that is rough and full of knots because that is the look they are seeking and so that is what lumber yards mostly stock. It can take some searching to find smooth, clear cedar.

Depending on your project, you might not need smooth cut. Getting it smooth cut can cost 4 or 5 times more because of the nature of cedar. Cedar trees have lots of small branches growing from every area of the trunk, which is why they make good Christmas trees. So, cedar naturally has lots of knots.
However, at the time of this writing, a rough cut 6 by 6 that is 10 feet long, which is the size I recommend for garden peace poles, is $60 most places. If you are painting the text on your peace pole, find someone with a belt sander, or rent one for $5 a day from a tool rental, and belt sand just the area where the text will be. That will make a nice frame for your text.

To make your own peace pole, I recommend getting a 6 by 6 post 10 feet long and burying 2 feet of it. Peace poles should have stature equal to the message. It takes a certain amount of size to achieve that. That big of a pole won’t fit as easily in a car and it is harder to carry around while working on it. It might just be more practical to get a smooth cut 4 by 4.
By the way, what is smoother and clearer than cedar, usually less expensive, can last even longer, and is more environmentally friendly than cedar? Redwood. A wood that is politically incorrect and could result in my being harassed for mentioning it. Cedar is cut from virgin forests in Canada. Redwood comes from a tree farm in California that is the size of the state of Ohio. That farm was planted in order to raise redwood as a crop to be sold as lumber and then replanted – a sustainable forest. But redwood is a hot button that causes politically correct hackers to damage your website and send nasty emails. So, everyone uses cedar.
Choosing Paint for Text
Choosing the paint for the text
An exterior trim paint for peace pole painting is good for text. That will be thicker and more durable than a paint meant for covering walls. The kind I use is Advantage 900 from PPG, a nationwide distributor in the USA. There are others that do the same thing, but what is good about this product is that even though it cleans up with water, it can be applied over an oil finish. That makes it possible to treat the pole with deck stain prior to painting the text, as discussed below. So, all the wood, even under the paint, gets the treatment. And that treatment works like a primer for the text, creating a smoother and less absorbent finish for the text paint.
When learning about how to make a peace pole and the detail that goes into it, it’s helpful to note that trim paint is available in quarts in many colors. I used Ultra Deep Base Advantage 900 mixed to Onyx Black color for most of my garden peace poles.
Preserving the Wood
Wood needs to be protected from the sun. UV rays from the sun break down wood just like they break down your skin. Deck treatments work like a suntan lotion to prevent the sun from breaking down the cells in the wood. And, like a normal suntan lotion, they need to be reapplied every so often. A coat or two of deck treatment goes on before the text is painted, and then every couple of years after that another coat of some kind of deck treatment should be rubbed on with a rag or brush to continue protecting it from the sun. If you have a deck, the schedule could be to rub on the peace pole a coat of whatever you use on your deck whenever you treat your deck. It will last a long time without that, but it will last longer with it.

PPG makes a deck treatment that can be used on cedar, redwood, pressure treated wood, and untreated wood. It’s called FloodDeck. It is a stain and a preservative. I was working on cedar and used the color they call “Natural” which gives it a slightly darker color that people like.
It might be that many deck treatments other than PPG’s would do the job. It has been years since I tested them. They were oil based when I tested them and now some states prohibit oil and require them to carry a formula that is not oil based. They tell me it will work the same. But after you prepare the wood with whatever sanding, cutting, and template outlining you are going to do, use some deck treatment on it first and then paint the text on last unless PPG tells you that Advantage 900 does not work on top of whatever treatment you have chosen.
I’m not a fan of varnish or urethane because of how bad those finishes look when they start to deteriorate, and how much work they are to clean up when they start to deteriorate. But deck treatment just wipes on and doesn’t become unsightly when it eventually is gone. After it is, it merely needs to be wiped on again, right over the text, which it will help to protect.
Burning Text with a magnifying glass
I received this message and these photos from someone making her own peace pole out of a tree stump.
Hello_ Greetings of peace to you! I first heard of Peace Poles this spring when a family at the Unitarian church I go to decided to donate a peace pole to our church when they moved out of state. Loved the idea and had to learn more just for general principle, so I went to your website. a month or two later, I met someone who did wood burning by magnifying glass on pencil markings on walking sticks. The light bulb went off in my head. Near the river where I live there is a huge tree that was cut down, all but the bottom 10-12 feet, last year due to disease. The bark is falling away, leaving the inner beauty of this wise old tree. So, using the translations you provide on your website, my magnifying glass, pencil, and sunglasses (the light gets intense), I am in the process of creating a peace tree. So far I have 7 languages represented and am energetically looking forward to adding as many as I can. i have Nepal, Spanish, Latin, Greek, Ojibwa, French, and English. I really like the idea of the music ones too. I’ll probably do the John Lennon “give peace a chance” one. It’s fun to be one with the sun while working as the position of the sun, clouds, etc. dictate where and when I can create the messages. The whole process is fulfilling. Thank You for your part in this creative endeavor of spreading the message of peace.
Namaste-Kathleen Engblom
Minnesota

Her magnifying glass she describes as “typical size.” She got it at a rummage sale. The typical size for her letters is 1.5 inches. She says it takes between an hour and an hour and a half to burn one translation. However, she has discovered that her work fades within months out in the elements. So she has started varnishing the messages with four coats of glossy. We are looking forward to hearing how that holds up over time.
Her photos were shot with a cell phone.
Update five months later
Hi Joel-just an update since i last contacted you regarding the peace tree/wood burning by magnifying glass project.
A lot has transpired since i last wrote. Over the summer I continued to write many different languages on the tree. I had 37 plus many different animals, birds, and some plants. two weeks ago the project came to a temporary halt when one day as i was going outside i heard a chainsaw…..a city parks worker noticed the tree and thought there was graffiti on it so he hired someone to come and cut it down! by that time he had already cut a vee from the base so it had to go.but the good news is that he agreed to leave the bottom part of the tree(that had my artwork on it) until he talked to city.i was completely devasted at that point. a few days later a Viet Nam vet that lives in the neighborhood talked to some people that knew some people and we got the peace tree project moved on to my apartment complex property free of charge(it must weigh several tons. my apt. caretaker contacted a cement worker and they poured a concrete base for the project to be put on at a reduced cost-materials only.my caretaker donated $243. in quarters for the job.i am in awe of the people who came forward with support in so many forms.
the whole situation has made me look at the possibility of making peace poles now. one of the first ones i make i think i will donate to the city so they can plant one in one of the city parks.
anyway, that’s the latest-i hope you are well and may peace prevail on earth
-Kathleen